 how-to
Natural Gas Line Installation for Outdoor Grill: 2026 Guide
Table of Contents
- Outdoor Grill Gas Line Installation Requirements: What You Need Before You Dig
- Natural Gas Line Size for BBQ Grill: Getting the Flow Right
- Step 1: Plan the Route and Gather Your Tools
- Step 2: Obtain the Natural Gas Grill Installation Permit
- Step 3: Trench, Run the Line, and Connect the Grill
- Natural Gas Line for Outdoor Grill Cost: What Drives the Price
- Step 4: Leak Test, Inspection, and Common Mistakes to Avoid
- Frequently Asked Questions
Last Updated: October 21, 2026
Outdoor Grill Gas Line Installation Requirements: What You Need Before You Dig
Natural gas line installation for an outdoor grill starts with one hard truth: natural gas line installation is a job for a licensed professional in most jurisdictions. A buried gas line that leaks can cause an explosion, and no grill is worth that risk. At allvalley, we've spent 26 years helping homeowners build backyard retreats.
Before anyone touches a shovel, you need to understand the requirements. These fall into four buckets:
- Licensing: Most states require a licensed plumber or gas fitter to run the line and make the final connection.
- Permits: Many cities and counties require a permit and inspection before gas flows.
- Line sizing: The pipe diameter must match the grill's BTU demand and the run length.
- Clearances and materials: Buried lines need approved pipe, correct depth, and safe distance from structures.
What most guides miss is that the permit and inspection process protects you. If something goes wrong later, an inspected install is your proof that the work was done to code.
Natural Gas Line Size for BBQ Grill: Getting the Flow Right
The right size for a natural gas line to a BBQ grill depends on two numbers: the grill's BTU rating and the distance from the meter. Undersizing the pipe starves the burners and gives you weak, uneven flames.
Here's the practical rule. A typical freestanding gas grill draws somewhere in the range of 40,000 to 60,000 BTUs. Larger built-in models can demand more. Longer runs need wider pipe to carry the same volume of gas without losing pressure.
Use this quick reference when you talk to your installer:
| Run Length (feet) | Common Pipe Size | Typical Grill Load |
|---|---|---|
| Under 25 | 1/2 inch | Standard freestanding grill |
| 25 to 50 | 3/4 inch | Large grill or grill plus side burner |
| 50 to 100 | 3/4 to 1 inch | Built-in grill with multiple burners |
| Over 100 | 1 inch or larger | Full outdoor kitchen setup |
These are starting points, not a substitute for a load calculation. Your installer will size the line based on total BTU demand, including any future additions like a side burner or outdoor fireplace.
Step 1: Plan the Route and Gather Your Tools
Step one is planning, and the route matters more than most people think. You want the shortest safe path from the gas meter or existing supply to the grill, with no buried utilities in the way.
Start by calling 811, the national call-before-you-dig service. Utility locators will mark existing lines for free, and this step is required by law in most states before any digging. Skipping it is the single most common and most dangerous mistake.
What you'll need on hand:
- Grill specifications with BTU rating
- Site plan or sketch of the route
- Utility locate confirmation from 811
- Approved gas pipe and fittings (installer-supplied)
- Shutoff valve rated for outdoor gas use
- Permit application details from your local building department
Sketch the route and note every turn, the depth of burial, and where the shutoff valve will sit. A clear plan makes the permit application faster and gives your installer an exact scope of work.
Step 2: Obtain the Natural Gas Grill Installation Permit
A natural gas grill installation permit is a document from your local building department that authorizes the work and schedules an inspection. Requirements vary by city and county, so check your local building department's website or call them directly.
The process usually looks like this:
- Submit an application with your route plan and grill specs.
- Pay the permit fee, which varies by jurisdiction.
- Schedule the work with a licensed installer.
- Book the inspection after the line is run but before backfilling the trench.
Some jurisdictions allow the homeowner to pull the permit while a licensed contractor does the work. Others require the contractor to pull it. Ask before you apply so you don't waste a trip.
Step 3: Trench, Run the Line, and Connect the Grill
Trenching and running the line is the phase where the plan meets the dirt. Depth requirements vary by jurisdiction, but buried gas lines typically need to sit well below the frost line and below the reach of normal digging. Your local code sets the exact number, so confirm it before digging.
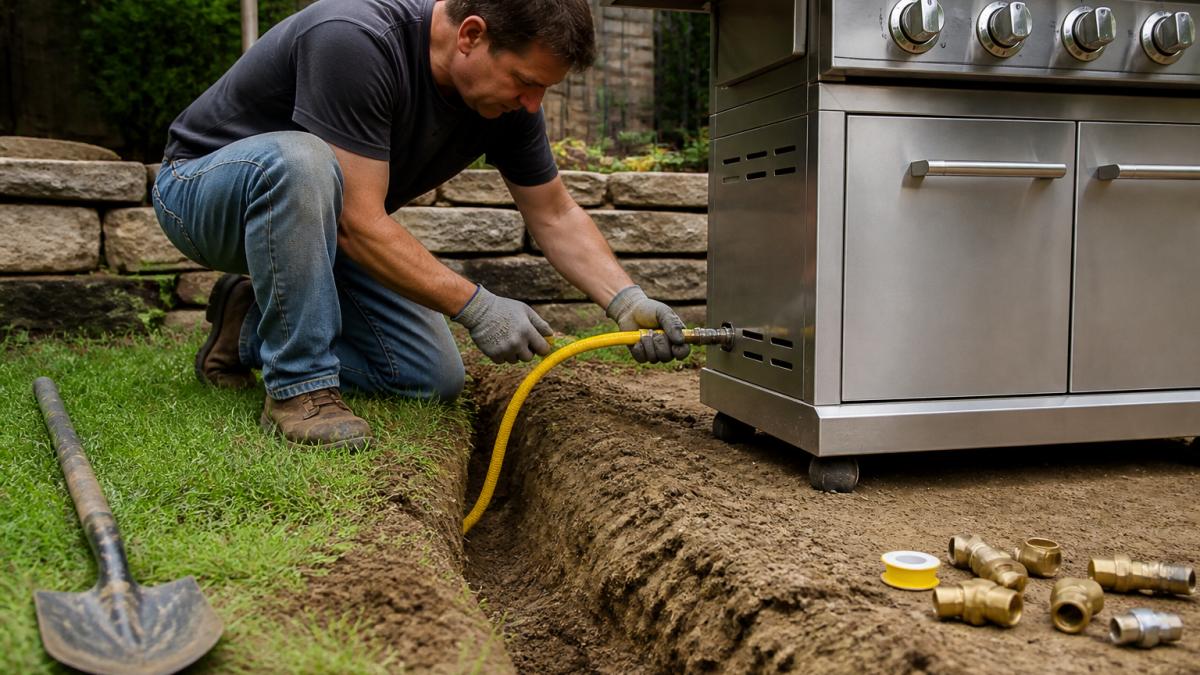
The sequence for this step:
- Dig the trench along the approved route, keeping the walls clear.
- Install the approved pipe, fittings, and shutoff valve.
- Leave the trench open for inspection.
- After inspection passes, connect the grill and test every joint.
- Backfill carefully, leaving slack at both ends for ground movement.
The final connection to the grill is where a licensed pro earns their fee. Threaded joints, sealant, and the regulator setup all need to be right. A single loose fitting is all it takes to create a hazard.
Natural Gas Line for Outdoor Grill Cost: What Drives the Price
The cost of a natural gas line for an outdoor grill depends on run length, trenching conditions, permit fees, and labor rates in your area. There's no single number, and any quote that ignores these factors is a guess.
Here's what moves the price up or down:
- Distance from the meter: Longer runs mean more pipe and more digging.
- Trenching method: Hand digging costs more than machine trenching, especially through hard soil or rock.
- Permit and inspection fees: These vary widely by jurisdiction.
- Materials: Pipe size, fittings, and valve quality all factor in.
- Site access: Tight side yards and landscaping slow the work down.
Get at least two written quotes that itemize materials, labor, permits, and inspection. A quote that lumps everything into one number hides where the money goes. Ask specifically whether permit fees are included.
Step 4: Leak Test, Inspection, and Common Mistakes to Avoid
The leak test and inspection are non-negotiable. Your installer should pressure-test the line and check every joint with a soap solution or an approved leak detector before the gas is turned on. The building inspector then signs off on the work.
Common mistakes we see homeowners make:
- Skipping the 811 utility locate before digging
- Undersizing the pipe for the grill's BTU demand
- Backfilling the trench before inspection
- Using indoor-rated valves or fittings outdoors
- Forgetting a shutoff valve at the grill for emergencies and maintenance
- Connecting the grill before the line passes inspection
One more thing: keep the inspection paperwork. It proves the work was done to code, and it matters if you ever sell the home or file an insurance claim.
If you'd rather not manage permits, trenching, and inspections yourself, that's exactly where a professional install pays for itself. allvalley offers delivery and installation services for outdoor living projects, and our team has handled backyard builds for 26 years. We can walk you through what your specific site needs before you commit to anything.
Frequently Asked Questions
How much does it cost to install a natural gas line for an outdoor grill?
The natural gas line for outdoor grill cost depends on the distance from your meter, trench length, local labor rates, and whether a permit or inspection is required. Pricing also varies with pipe material and any necessary pressure regulator or shutoff valve. Because these factors change from yard to yard, there is no single flat rate. Get a written quote that itemizes labor, materials, permit fees, and inspection so you can compare bids accurately and avoid surprise charges.
What size gas line does an outdoor grill need?
The natural gas line size for BBQ grill setups typically runs from 1/2-inch to 3/4-inch inside diameter, depending on the grill's BTU rating and the distance from the meter. A high-output grill with a long run may need a larger line to maintain adequate pressure. Always size the line using the appliance's input rating and the equivalent length of pipe, including fittings. Undersizing causes weak flames and poor performance, so confirm the calculation with your installer or the local code office before buying materials.
Do you need a permit to install a natural gas line for an outdoor grill?
In most jurisdictions, a natural gas grill installation permit is required for any new gas line, even a short outdoor run. Permits ensure the work meets safety codes and is inspected by a licensed professional. Some areas allow homeowner permits for minor work, but many require a licensed gas fitter. Check with your local building department before digging. Skipping the permit can void insurance coverage and create problems when you sell your home.
Can you connect an outdoor grill to a natural gas line yourself?
Connecting a grill to an existing gas line is often a simple DIY task if the line and shutoff valve are already in place and properly sized. However, running a new line from the meter, trenching, and making permanent connections usually require a licensed professional and a permit. Gas work carries serious safety risks, including leaks and fire. If you are unsure about any step, hire a licensed installer. The cost of professional installation is small compared with the risk of a mistake.
A gas line to your grill is a permanent upgrade to your outdoor space, and it deserves a careful install. If you're planning a full backyard retreat, allvalley can help with the equipment and the installation, from premium BBQ setups to hot tubs that come with free starter kits and chemicals. Call us at 760-342-5277 to talk through your project and get the details right the first time.